NCR Counterpoint Management Console:
Server view
When you select your Hub server from the Object Explorer, the NCR Counterpoint Management Console displays a series of tabs that allow you to review important information about the server, manage the stores and workstations assigned to the server, monitor CPServices communication activity between the server and its workstations, and configure important Multi-Site, e-mail, and data aggregation settings.
The Server view includes the following tabs:
 Summary
The ![]() Summary tab displays a summary of information about the selected server, including the server's Machine Name, the shared Top-level directory on the server, the Software version and Database version on the server, and so forth.
Summary tab displays a summary of information about the selected server, including the server's Machine Name, the shared Top-level directory on the server, the Software version and Database version on the server, and so forth.
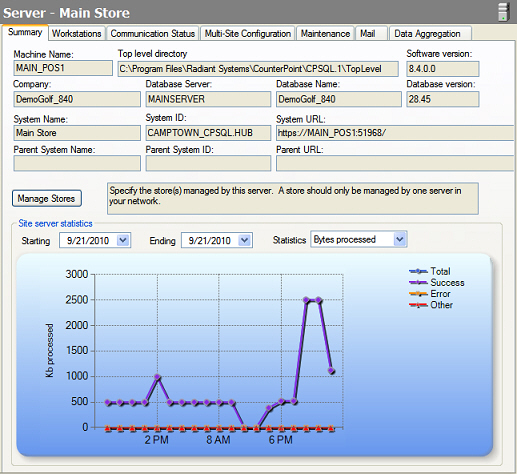
If the server is a Remote site server in a Multi-Site environment, the Summary tab displays the Parent System Name, Parent System ID, and Parent URL for the Hub server.
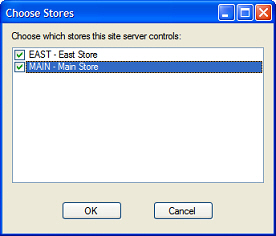
Click the Manage Stores button to display the ![]() Choose Stores dialog, which allows you to specify the stores that the server manages.
Choose Stores dialog, which allows you to specify the stores that the server manages.
In the Site server statistics area, select a Starting date and an Ending date to specify a date range, and then select an option (either Bytes processed or Package count) from the Statistics field to display a graph of server activity.
The graph indicates the number of package received from all offline workstations each hour over the specified date range for each of the following categories.
-
Total packages received
-
Successful packages
-
Packages with Errors
-
Packages with an unknown or Other status
Workstations
The ![]() Workstations tab displays the Point of Sale stations that have been created for the stores that the selected server manages, along with the workstations that are assigned to them by default, sorted by Workgroup.
Workstations tab displays the Point of Sale stations that have been created for the stores that the selected server manages, along with the workstations that are assigned to them by default, sorted by Workgroup.

To register a workstation and assign it to a particular Point of Sale station, enter the name of the workstation in the Machine field on the row that corresponds to the Station, and then enter a brief Description for the workstation.
![]() You can also use the Workstations window (Setup > System > Workstations) in Counterpoint to register workstations and assign them to default workgroups and stations.
You can also use the Workstations window (Setup > System > Workstations) in Counterpoint to register workstations and assign them to default workgroups and stations.
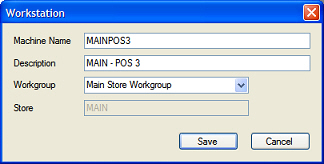
If the Point of Sale station you want to assign a workstation to is not listed (e.g., the station record hasn't been created in Counterpoint) or you don't want to assign the workstation to a particular station (e.g., you are registering a "floating" workstation or a non-Point-of-Sale workstation), click the Add Workstation button to display the ![]() Workstation dialog, enter the Machine name and a brief Description for the workstation, select the workstation's default Workgroup, and then click Save to register the workstation.
Workstation dialog, enter the Machine name and a brief Description for the workstation, select the workstation's default Workgroup, and then click Save to register the workstation.
To remove a workstation from the Workstations tab, disassociating it from its assigned Point of Sale station, select its Machine name and click the Remove/Unassign Workstation button.
Communication Status
The ![]() Communication Status tab lists each server and workstation at the selected site and indicates each system's connection status, the date and time of the last CPServices event for each system, the number of packages sent to and received from each system, and the number of errors that occurred during the last CPServices event.
Communication Status tab lists each server and workstation at the selected site and indicates each system's connection status, the date and time of the last CPServices event for each system, the number of packages sent to and received from each system, and the number of errors that occurred during the last CPServices event.
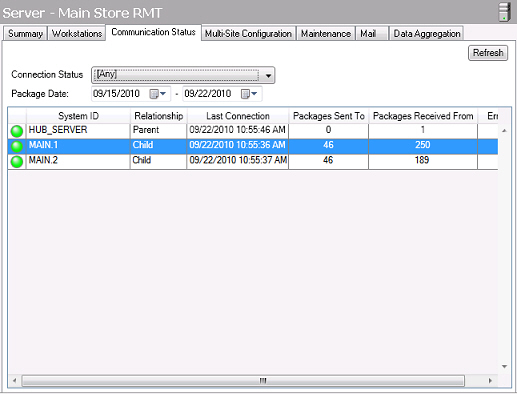
One of the following icons indicates the connection status for each server or workstation:
![]() This icon indicates that the corresponding system has connected within the past 10 minutes.
This icon indicates that the corresponding system has connected within the past 10 minutes.
![]() This icon indicates that the corresponding system has connected within the past 15 minutes.
This icon indicates that the corresponding system has connected within the past 15 minutes.
![]() This icon indicates that the corresponding system has not connected within the past 15 minutes.
This icon indicates that the corresponding system has not connected within the past 15 minutes.
Select one of these icons from the Connection Status list box to filter the Connection Status tab to display only systems with that connection status.
You can specify a Package Date range for the Communication Status tab by selecting a start date and end date, and then clicking the Refresh button.
Multi-Site Configuration
In a Multi-Site environment, the ![]() Multi-Site Configuration tab allows you to manage replication activity for your Hub server and your Remote site servers. For each server in your replication network, you can subscribe to the appropriate work sets, schedule replication, and initiate replication manually.
Multi-Site Configuration tab allows you to manage replication activity for your Hub server and your Remote site servers. For each server in your replication network, you can subscribe to the appropriate work sets, schedule replication, and initiate replication manually.
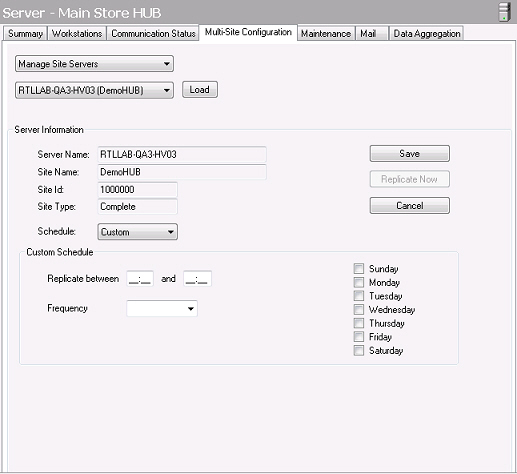
By default, all servers are scheduled to replicate every 30 minutes. To define a different replication schedule for a server, select Manage Site Servers from the Select Action list, select a Remote server from the Select Server list and click Load, select Custom from the Schedule field, and then specify the start and end time and Frequency for each day you want the server to replicate.
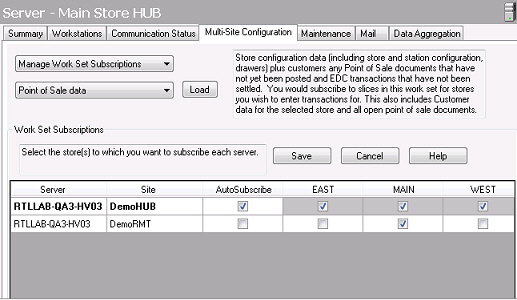
To subscribe a Remote server to the appropriate work sets, select ![]() Manage Work Set Subscriptions from the Select Action list, select each work set, in turn, from the Select Work Set list and click Load, and then select the check box for each store or location to which you want to subscribe each server.
Manage Work Set Subscriptions from the Select Action list, select each work set, in turn, from the Select Work Set list and click Load, and then select the check box for each store or location to which you want to subscribe each server.
To initiate replication between your Hub server and a Remote server, select Manage Site Servers from the Select Action list, select the Remote server you want to replicate and click Load, and then click the Replicate Now button.
Maintenance
The ![]() Maintenance tab allows you to specify a daily maintenance schedule for the selected server's Counterpoint database. During each specified time period, the Radiant Counterpoint Service (CPServices) will suspend all operations, allowing you to perform any SQL Server maintenance functions that require complete access to your server database.
Maintenance tab allows you to specify a daily maintenance schedule for the selected server's Counterpoint database. During each specified time period, the Radiant Counterpoint Service (CPServices) will suspend all operations, allowing you to perform any SQL Server maintenance functions that require complete access to your server database.
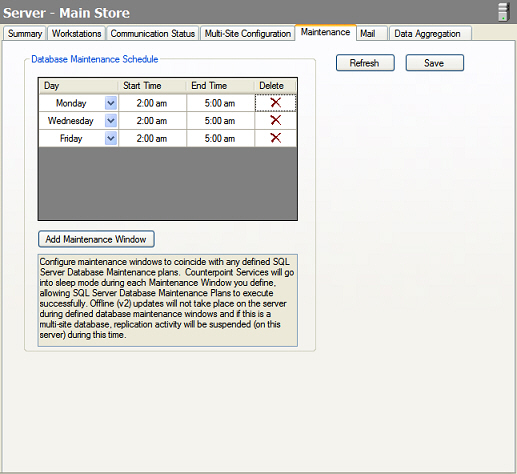
Each maintenance window specifies a day and time period during which CPServices will be inactive. To define a maintenance window, click the Add Maintenance Window button, select the Day on which the maintenance window will occur each week, and then enter the Start Time and End Time for the maintenance period.
![]() You must enter pm in the Start Time and End Time fields to specify afternoon time values.
You must enter pm in the Start Time and End Time fields to specify afternoon time values.
Click the ![]() button in the Delete column to delete the corresponding maintenance window.
button in the Delete column to delete the corresponding maintenance window.
Mail
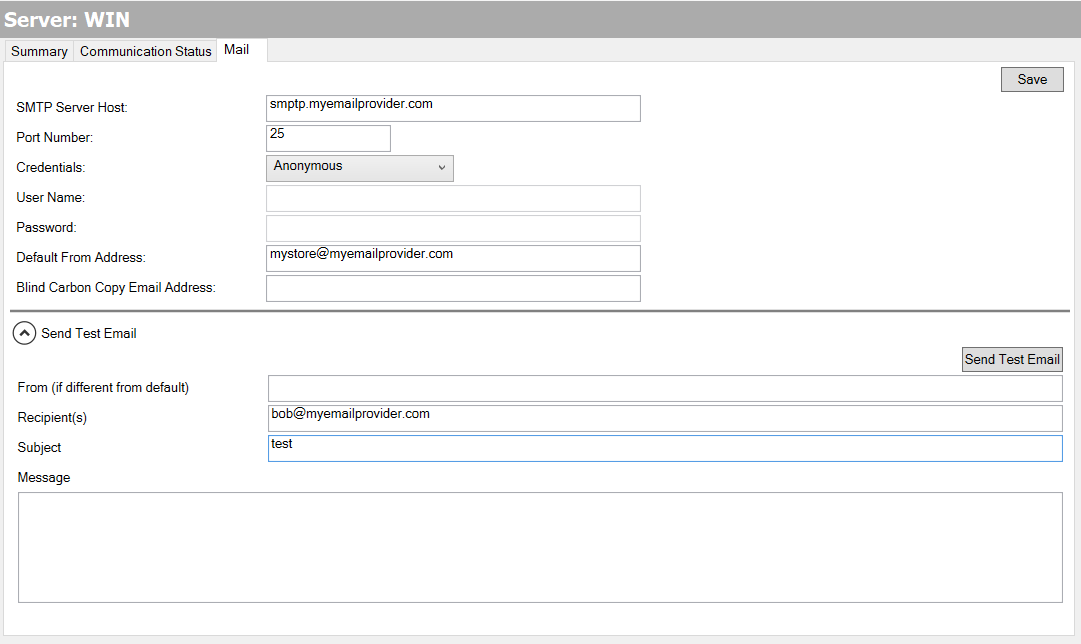
The ![]() Mail tab allows you to define e-mail related settings to enable Counterpoint users to send receipts, reports, and customer statements via e-mail.
Mail tab allows you to define e-mail related settings to enable Counterpoint users to send receipts, reports, and customer statements via e-mail.
Data Aggregation
The ![]() Data Aggregation tab allows you to schedule Counterpoint's various data aggregation tasks, which summarize the necessary sales history data for the Dashboard, forecast data for forecast-driven replenishment, and transaction log data for the Point of Sale Exceptions report.
Data Aggregation tab allows you to schedule Counterpoint's various data aggregation tasks, which summarize the necessary sales history data for the Dashboard, forecast data for forecast-driven replenishment, and transaction log data for the Point of Sale Exceptions report.
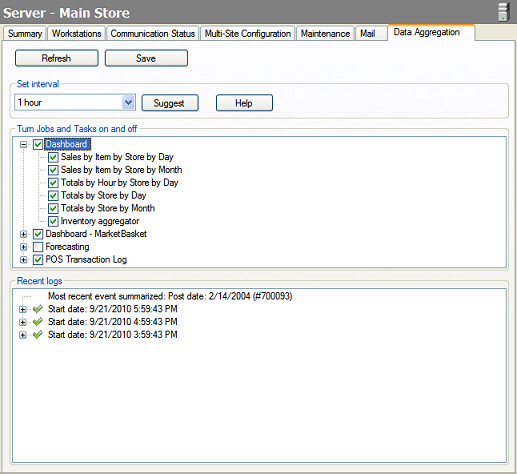
Before you can use any of these features, you must populate the corresponding data aggregation tables from your company's historical data by scheduling the appropriate tasks to run frequently, until all of your existing data is aggregated. Once your existing data is aggregated, you can schedule the data aggregation tasks to run nightly, ensuring that the necessary data is up-to-date each morning.
![]() If you are using Counterpoint in a Multi-Site environment, schedule the data aggregation tasks at the Hub only.
If you are using Counterpoint in a Multi-Site environment, schedule the data aggregation tasks at the Hub only.
Follow these steps to schedule the appropriate data aggregation tasks for the features you are using:
-
Select a time interval from the Set interval list box. This interval determines how many minutes will elapse between instances of the scheduled data aggregation tasks.
Click the Suggest button to use the suggested interval for your database.
-
Enable the data aggregation tasks for the features you are using by selecting the corresponding check boxes:
-
If you are using the Dashboard, select the Dashboard check box.
-
If you are using the MarketBasket page of the Dashboard, select the Dashboard - MarketBasket check box.
-
If you are using forecast-driven replenishment, select the Forecasting check box.
-
If you are using the Point of Sale Exceptions report, select the POS Transaction Log check box.
![]() You can expand each set of data aggregation tasks and turn individual tasks on or off, if you only want to aggregate specific data, but it is not recommended.
You can expand each set of data aggregation tasks and turn individual tasks on or off, if you only want to aggregate specific data, but it is not recommended.
-
Click the Save button to save your data aggregation schedule.
When the Recent logs area of the Data Aggregation tab indicates that your most recent data has been aggregated, the initial aggregation process is complete. At that point, you should reschedule the data aggregation tasks to run less frequently, so they will not interfere with your daily operations. We recommend you schedule data aggregation to run every 24 hours.
![]() If you are updating from a previous version of Counterpoint, you must use the NCR Counterpoint Management Console to schedule the appropriate data aggregation tasks after you complete the update process. You will no longer use the Scheduled Tasks utility to schedule data aggregation.
If you are updating from a previous version of Counterpoint, you must use the NCR Counterpoint Management Console to schedule the appropriate data aggregation tasks after you complete the update process. You will no longer use the Scheduled Tasks utility to schedule data aggregation.