EMV Support
If you are using Ingenico iSC250, iPP320, or iSMP4 payment terminals with NCR Secure Pay, complete the configuration steps outlined below to use them to process EMV card transactions.
![]() The Ingenico iPP320 and iSMP4 are low-cost devices and do not have signature capture capabilities. The rotating advertisements feature is not supported in the Ingenico devices.
The Ingenico iPP320 and iSMP4 are low-cost devices and do not have signature capture capabilities. The rotating advertisements feature is not supported in the Ingenico devices.
You will also be able to enter an EMV card number and expiration date manually when a card is unreadable or unavailable, as well as to add a card on file to a customer record.
![]() NCR Counterpoint supports EMV debit cards processed through Worldpay, FDMS North, and Vantiv. If you are using a different processor and a customer
tenders a Visa- or MasterCard-branded EMV debit card, it will be processed
through the credit processing channel as a signature credit transaction.
NCR Counterpoint supports EMV debit cards processed through Worldpay, FDMS North, and Vantiv. If you are using a different processor and a customer
tenders a Visa- or MasterCard-branded EMV debit card, it will be processed
through the credit processing channel as a signature credit transaction.
 Updating
Your NCR Secure Pay Account (Worldpay)
Updating
Your NCR Secure Pay Account (Worldpay)
If you are already processing transactions through Worldpay, you must update your NCR Secure Pay account by following these steps before you can begin processing EMV card transactions:
-
Contact NCR Merchant Solutions and ask to have your store's Merchant Number changed to use Worldpay TCMP. NCR Merchant Solutions will create a new account for your store and provide you with a new VAR sheet for the account.
-
When you have received the new VAR sheet for your account, browse to the NCR Secure Pay area of the NCR Counterpoint user portal, click the My Account link, enter your Master ID and Password, and then click Next to log in to your NCR Secure Pay account.
-
Click the Edit store link for your store to display the Update Store Information page.
-
Click the Change Processor button to display the Change Store Processor page.
-
Select RBS WorldPay [TCMP] from the New Processor list box.
-
Enter the Terminal ID and other information on your VAR sheet in the corresponding fields.
-
Click the Change Processor button.
A message with updated credentials for your store—including a new Secure Pay Portal Username, Secure Pay Portal Password, Secure Pay Merchant Id, and EDC POS password—will be sent to your company's Contact Email address.
-
Log in to the NCR Secure Pay Settlement portal using your new Secure Pay Portal Username and Secure Pay Portal Password, click the Settings link, and verify the settings for your store.
-
In NCR Counterpoint, select Setup > Point of Sale > Stores to display the Stores window, enter or look up your Store, and enter the new Secure Pay Merchant Id and EDC POS password for your store.
![]() Click
the Test Connection button
to verify your settings.
Click
the Test Connection button
to verify your settings.
-
Save your changes and close the Stores window.
![]() You
will still be able to log in to the NCR Secure Pay Settlement portal
using your previous Login ID
and Password, allowing you
to review and settle transactions.
You
will still be able to log in to the NCR Secure Pay Settlement portal
using your previous Login ID
and Password, allowing you
to review and settle transactions.
![]() If you have pending orders for
which you have not processed final payments, you will need to obtain
payment information for those orders again after you update your NCR
Secure Pay account. Similarly, to perform a validated return for a
ticket that was processed before you updated your NCR Secure Pay account,
you must re-swipe the original card.
If you have pending orders for
which you have not processed final payments, you will need to obtain
payment information for those orders again after you update your NCR
Secure Pay account. Similarly, to perform a validated return for a
ticket that was processed before you updated your NCR Secure Pay account,
you must re-swipe the original card.
Updating Your NCR Secure Pay Account (TSYS)
If you are already processing transactions through TSYS, you must update your NCR Secure Pay account to include an Authentication Code for each store. You may need to obtain a new VAR sheet from TSYS for each store that includes the corresponding Authentication Code value.
Follow these steps to add the appropriate Authentication Code to each of your stores:
- Log in to the NCR Secure Pay Settlement portal.
- Click the Settings link at the top of the Credit Settlement portal.

- On the Credit Setup window, under Processor Configuration, enter the Authentication Code value for the store.
- Click the Save Changes button to save your changes.
![]() Repeat these steps for each of your stores.
Repeat these steps for each of your stores.
Updating Your NCR Secure Pay Account (Vantiv)
If you are already processing transactions through Vantiv, you must update your NCR Secure Pay account by following these steps before you can begin processing EMV card transactions:
- Contact Vantiv or your bank and ask to have your merchant account changed to use the Vantiv 610 platform.
- When you have received a new VAR sheet for your account, browse to the NCR Secure Pay area of the NCR Counterpoint user portal, click the My Account link, enter your Master ID and Password, and then click Next to log in to your NCR Secure Pay account.
- Click the Edit store link for your store to display the Update Store Information page.
- Click the Change Processor button to display the Change Store Processor page.
- Select Vantiv [610] from the New Processor list box.
- Enter the Merchant ID and other information on your VAR sheet in the corresponding fields.
- Click the Change Processor button.
A message with updated credentials for your store—including a new Secure Pay Portal Username, Secure Pay Portal Password, Secure Pay Merchant Id, and EDC POS password—will be sent to your company's Contact Email address.
- Log in to the NCR Secure Pay Settlement portal using your new Secure Pay Portal Username and Secure Pay Portal Password, click the Settings link, and verify the settings for your store.
- In NCR Counterpoint, select Setup > Point of Sale > Stores to display the Stores window, enter or look up your Store, and enter the new Secure Pay Merchant Id and EDC POS password for your store.
![]() Click the Test Connection button to verify your settings.
Click the Test Connection button to verify your settings.
- Save your changes and close the Stores window.
![]() You will still be able to log in to the NCR Secure Pay Settlement portal using your previous Login ID and Password, allowing you to review and settle transactions.
You will still be able to log in to the NCR Secure Pay Settlement portal using your previous Login ID and Password, allowing you to review and settle transactions.
![]() If you have pending orders for which you have not processed final payments, you will need to obtain payment information for those orders again after you update your NCR Secure Pay account. Similarly, to perform a validated return for a ticket that was processed before you updated your NCR Secure Pay account, you must re-swipe the original card.
If you have pending orders for which you have not processed final payments, you will need to obtain payment information for those orders again after you update your NCR Secure Pay account. Similarly, to perform a validated return for a ticket that was processed before you updated your NCR Secure Pay account, you must re-swipe the original card.
Updating Your NCR Secure Pay Account (Chase Paymentech)
If you are already processing transactions through Chase Paymentech, you do not need to make any changes to your NCR Secure Pay account to begin processing EMV card transactions.
Enabling
EMV and EMV Contactless Entry Modes in NCR Secure Pay
Before you can process EMV card transactions in your store(s), you must enable the appropriate EMV entry modes for the corresponding NCR Secure Pay account(s) by following these steps:
-
Log in to the NCR Secure Pay Settlement portal.
-
Click the
Settings
link at the top of the Credit Settlement portal.
-
On the Credit Setup window, under
EMV
entry modes, select the check boxes for the payment
types for which you will accept EMV cards.  EMV® Contactless is supported with CPSQL v8.5.4.1 or later and RBA v23.0.
 NCR
Secure Pay supports EMV debit cards processed through Worldpay, FDMS North, and Vantiv. If you are using a different processor and a customer tenders a Visa- or MasterCard-branded
EMV debit card, it will be processed through the credit processing
channel as a signature credit transaction.
NCR
Secure Pay supports EMV debit cards processed through Worldpay, FDMS North, and Vantiv. If you are using a different processor and a customer tenders a Visa- or MasterCard-branded
EMV debit card, it will be processed through the credit processing
channel as a signature credit transaction.
-
Click the Save Changes button to save your changes.
![]() If you are
using the Loopback Emulator
processor for testing purposes, select the EMV
test mode check box to configure NCR Secure Pay to process
test EMV card transactions. Make sure to clear this check box before
you begin processing live transactions with your actual processor.
If you are
using the Loopback Emulator
processor for testing purposes, select the EMV
test mode check box to configure NCR Secure Pay to process
test EMV card transactions. Make sure to clear this check box before
you begin processing live transactions with your actual processor.
For each EMV entry mode you select, a pay code with the appropriate name (listed below) and Card prefix value(s) (i.e., bin range) must be defined on the Pay Codes window (Setup > System > Pay Codes) and assigned to your store on the Stores window (Setup > Point of Sale > Stores).
|
Card Type |
Pay Codes |
|
Visa |
VISA or CRCARD |
|
Debit (any brand) |
DEBIT or CRCARD |
|
MasterCard |
MASTERCARD, MC, or CRCARD |
|
American Express |
AMEX, EXPRESS, or CRCARD |
|
Diner's Club |
DINERS, DC, or CRCARD |
|
Discover |
DISCOVER, DISC, or CRCARD |
|
JCB |
JCB or CRCARD |
|
Carte Blanche |
CARTEBLANCHE, CB, or CRCARD |
|
SVC |
SVCGIFT or SVC |
|
China Union Pay |
CUP or CRCARD |
|
EBT |
EBT |
Most of the settings that are defined on the Tender tab of the Pay Codes window for each Credit card pay code are ignored when you are operating in EMV mode. Instead, the default settings listed below are used for all card types in EMV mode:
|
Pay Code Setting |
Default for EMV Mode |
| Minimum tender | 0.00 |
| Maximum tender/Unlimited tender | Unlimited |
| Maximum change/Unlimited change | Unlimited |
| Maximum refund/Unlimited refund | Unlimited |
| Maximum overtender/Unlimited overtender | Unlimited |
| Use signature capture for tender | Determined by Card Verification Method (CVM) assigned to card |
| Use signature capture for refund | Determined by Card Verification Method (CVM) assigned to card |
| Open drawer | No |
| Default amount | Amount due |
| Allow for orders | Yes |
| Allow for layaways | Yes |
| Default document amount | None |
| Default document final payment | None |
| Validate-1 prompt | N/A |
| Validate-2 prompt | N/A |
| Validate-3 prompt | N/A |
| Custom fields | N/A |
| Payment custom prompts | N/A |
In addition, make sure the Online setting is selected from the ![]() EDC transactions list box on the Main tab of the Pay Codes window (Setup > System > Pay Codes) for each Credit card pay code. The Force and Do not process settings are not valid for use with EMV and could cause unexpected results.
EDC transactions list box on the Main tab of the Pay Codes window (Setup > System > Pay Codes) for each Credit card pay code. The Force and Do not process settings are not valid for use with EMV and could cause unexpected results.
![]()
Configuring
iSC250, iPP320, and iSMP4 Payment Terminals for EMV
Follow these steps to configure your iSC250, iPP320, and iSMP4 payment terminal(s) to process EMV card transactions:
-
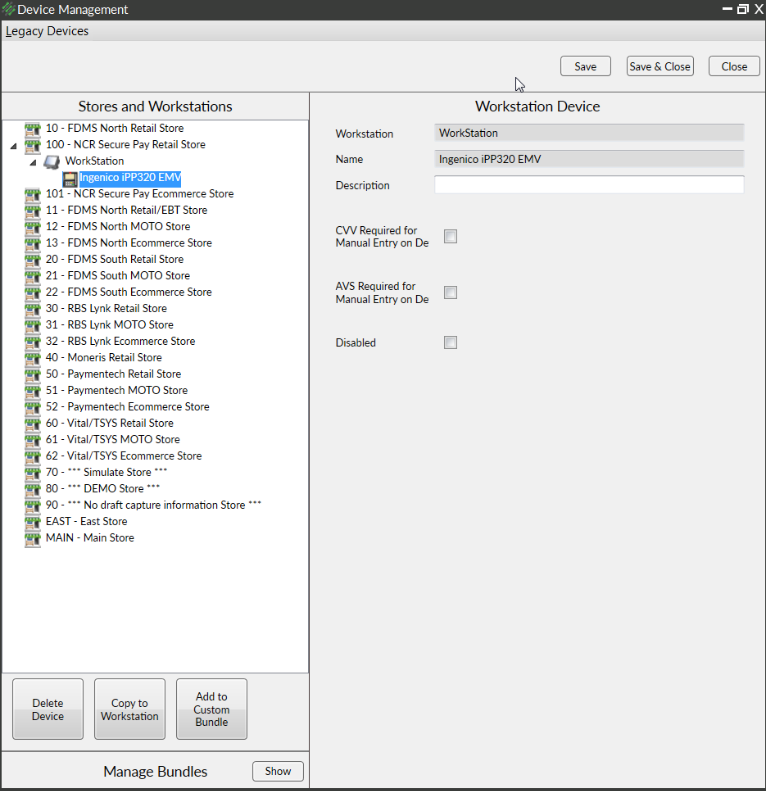
From the NCR Counterpoint main menu, select Setup > Point of Sale > Devices to display the Device Management window, and then double-click your store in the Stores and Workstations tree.
-
Double-click a workstation to which an iSC250, iPP320, or iSMP4 payment terminal is connected.
-
If an Ingenico iSC250, iPP320, or iSMP4 device entry already exists for the workstation, right-click the entry, select Delete Device, and click Yes on the Confirm dialog to delete the device entry.
-
Click the Add a Device button, select Payment Terminals, and then select any of the following to create a new device entry:
•Ingenico iSC250 EMV
•Ingenico iPP320 EMV
•Ingenico iSMP4 EMV
-
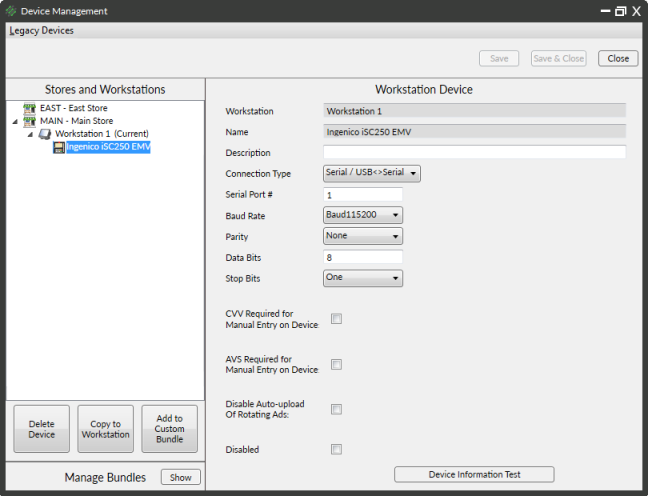
Select the device entry to display its Workstation Device settings, and then enter a Description for the device.
•
Ingenico
iSC250 EMV Workstation
Device
•
Ingenico
iPP320 EMV Workstation
Device
•
Ingenico
iSMP4 EMV Workstation
Device
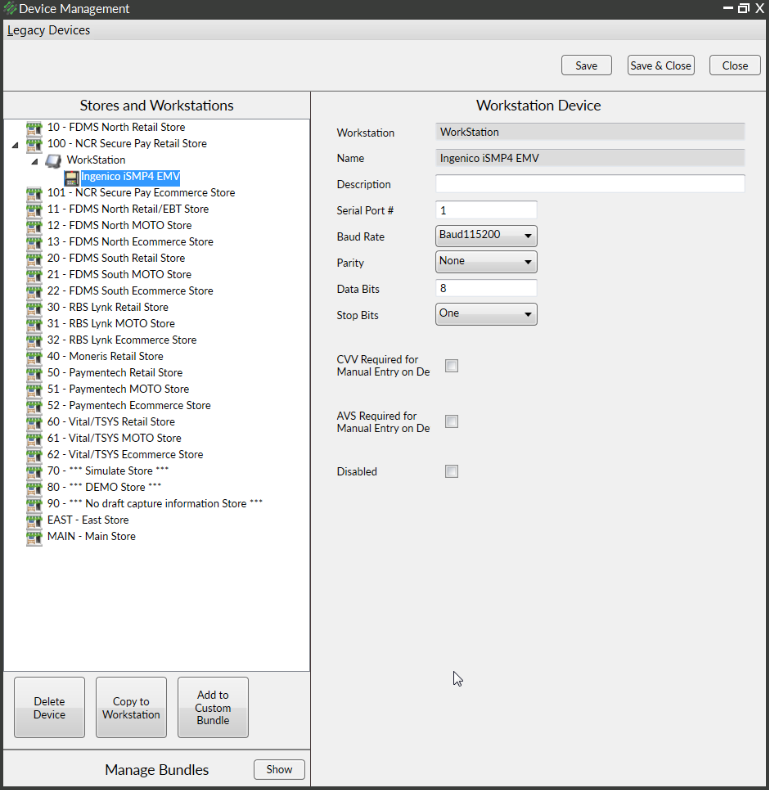
- Select the Connection Type you are using, either Serial / USB<>Serial (if you are using a serial interface) or USB-HID (if you are using the USB-HID interface).
-
If you selected Serial / USB<>Serial from the Connection Type list box, enter the Serial Port # of the COM port to which you connected the payment terminal.
-
Select the CVV Required for Manual Entry on Device check box to require a Card Verification Value/Card Identification CVV/CID number for each card number that is entered manually.
With this setting, when a card number is entered manually (for example, if the customer's card is unreadable, for example), the customer will be prompted to enter a CVV/CID number on the payment terminal.
-
Select the AVS Required for Manual Entry on Device (EMV only) check box to require address verification information for each card number that is entered manually.
With this setting, when a card number is entered manually, the customer will be prompted to enter his or her ZIP Code on the payment terminal.
-
Click the Device Information Test button to test the connection to the payment terminal.
If the test is successful, the ![]() Device Information Test dialog displays details for the device, along with the "TEST SUCCESSFUL" message. Click Close to close this message and return to the Device Management window.
Device Information Test dialog displays details for the device, along with the "TEST SUCCESSFUL" message. Click Close to close this message and return to the Device Management window.
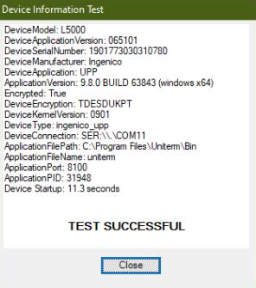
If the test is not successful, verify the payment terminal's communication settings and physical connection and test the device again.
-
Click the Save button to save your device settings.
![]() Repeat
these steps for each workstation with an iSC250, iPP320, or iSMP4 payment terminal.
Repeat
these steps for each workstation with an iSC250, iPP320, or iSMP4 payment terminal.
Customizing
the Payment Entry Toolbar for Manual Entry
To allow customers or users to enter card numbers manually in Ticket Entry when a card is unreadable or unavailable, you must add a button to the toolbar on the Payment Entry window by following these steps:
-
Log in to Ticket Entry and click the Payment button to display the Payment Entry window.
-
Right-click the title bar, select Customize toolbars, and click the Customize button to display the Customize dialog.
-
Select the Command tab, and then select Payment from the Categories list.
-
Drag the Auto Card Payment by manual entry command from the Commands list to the toolbar (e.g., next to the Use customer card button) to create a new button for the command.
-
Right-click the new button, click Name, and enter an appropriate label for the new button (e.g., Manual Entry).
-
Close the Customize dialog, close the Toolbar editor, and click Yes on the confirmation prompt to save your changes.
Configuring
EMV Actions for Touchscreen Ticket Entry
To allow users to process EMV card transactions in Touchscreen
Ticket Entry, assign the Auto
card payment action to a button in your touchscreen layout
using the ![]() Button Editor
(Setup > Point of Sale > Touchscreen
Codes).
Button Editor
(Setup > Point of Sale > Touchscreen
Codes).
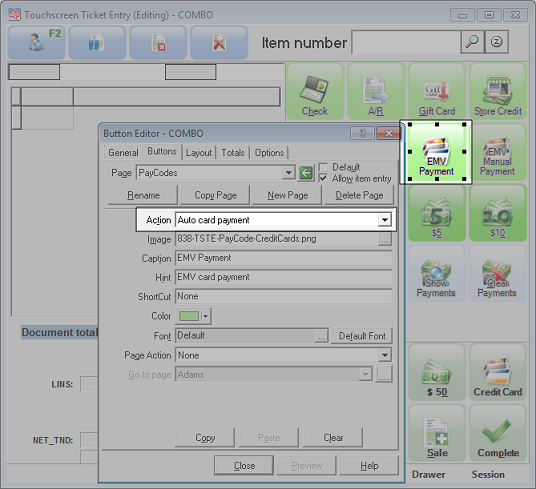
If you have already assigned the Card payment action to a button in your touchscreen layout, reassign the Auto card payment action to that button.
To allow users to enter card numbers manually in Touchscreen Ticket Entry, you must assign the Auto card payment by manual entry action to a button in your touchscreen layout.
![]() Do not assign the Auto card payment action or the Auto card payment by manual entry action to buttons in your touchscreen layout if your NCR Counterpoint system is not configured to process EMV transactions.
Do not assign the Auto card payment action or the Auto card payment by manual entry action to buttons in your touchscreen layout if your NCR Counterpoint system is not configured to process EMV transactions.
Updating
Form Groups
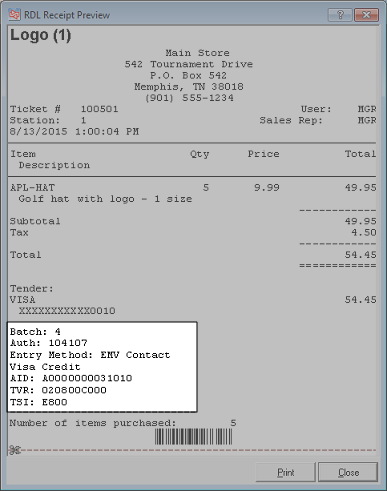
In this Service Pack, a number of Point of Sale forms have been
modified to include ![]() additional information that is
required for EMV card transactions, including the Application Identifier
(AID), Terminal Verification Results value (TVR), Application Cryptogram (AC), and Transaction
Status Information value (TSI).
additional information that is
required for EMV card transactions, including the Application Identifier
(AID), Terminal Verification Results value (TVR), Application Cryptogram (AC), and Transaction
Status Information value (TSI).
If your Counterpoint system is configured to use .rdlc receipts, you do not need to modify any existing form groups to include the required EMV data on receipts and other relevant Point of Sale forms. However, if you are using Crystal Report format (.rpt) receipts, you must use the Form Groups window (Setup > Point of Sale > Form Groups) to replace the following forms in your existing form groups:
|
Replace this form... |
with this form... |
| Receipt1.rpt | Receipt1EMV.rpt |
| SalesDraft1.rpt | SalesDraft1EMV.rpt |
| Layaway1.rpt | Layaway1EMV.rpt |
| Order1.rpt | Order1EMV.rpt |
| PayInOut1.rpt | PayInOut1EMV.rpt |
| PayOnAcct1.rpt | PayOnAcct1EMV.rpt |
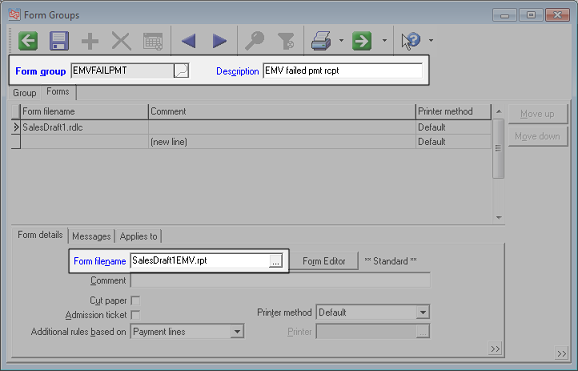
Also, because receipts must always be printed and provided to the customer for failed or cancelled
EMV card transactions, this Service Pack includes the new EMVFAILPMT
form group. If you are using .rdlc
receipts, replace the SalesDraft1EMV.rdlc
form with the SalesDraft1.rdlc
form in the new ![]() EMVFAILPMT
form group.
EMVFAILPMT
form group.
Finally, if your stations are not configured to use all form groups,
use the ![]() Stations
window (Setup > Point of Sale
> Stations) to assign the EMVFAILPMT
form group to each of your stations.
Stations
window (Setup > Point of Sale
> Stations) to assign the EMVFAILPMT
form group to each of your stations.
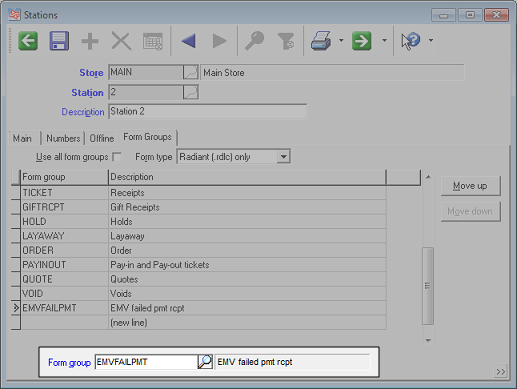
![]() If
the Use all form groups check
box is selected for a station, you do not have to assign the EMVFAILPMT form group to that station.
If
the Use all form groups check
box is selected for a station, you do not have to assign the EMVFAILPMT form group to that station.
Customized Receipts
If you are updating from a previous version of NCR Counterpoint and you have customized your receipts or any of the Point of Sale forms listed above, you should apply your custom modifications to the new EMV versions of these forms to ensure that they include the necessary additional information for EMV transactions.
Processing
EMV Card Transactions
Once you have configured your iSC250 payment terminal(s), NCR Counterpoint, and NCR Secure Pay (by following the steps outlined above), you are ready to begin processing EMV card transactions.
When you finish adding items to a ticket in Ticket Entry or Touchscreen Ticket Entry, follow these steps to process an EMV payment:
-
Click (or touch) the Complete button to display the
Amount dialog,
which allows you to specify the amount for the payment.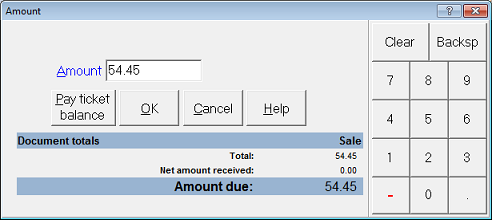
![]() If you are using Touchscreen Ticket Entry and you have assigned the Auto card payment action to a button in your touchscreen layout, as described under Configuring
EMV Actions for Touchscreen Ticket Entry above, you can also touch that button to display the Amount dialog box.
If you are using Touchscreen Ticket Entry and you have assigned the Auto card payment action to a button in your touchscreen layout, as described under Configuring
EMV Actions for Touchscreen Ticket Entry above, you can also touch that button to display the Amount dialog box.
If you are using Ticket Entry, you can also click the Payment button to display the Payment Entry window, and then click the Card Pmt button to display the Amount dialog box.
Enter the Amount for the payment and click OK, or click the Pay ticket balance button to automatically set the payment amount to the current Amount due and continue.
![]() By
default, the Amount value
is automatically set to the current Amount
due for the ticket.
By
default, the Amount value
is automatically set to the current Amount
due for the ticket.
If you enter an Amount that
is less than the current Amount due,
Counterpoint will create a placeholder payment line for the card
payment, allowing the customer to tender additional forms of payment.
The customer will be prompted to insert or swipe a card only when
you have entered payments for the entire Amount
due for the ticket.
![]() If the customer wants to tender multiple forms of payment (e.g., cash and a credit card), you must use a standard pay code button to process each non-card payment. If you use the Complete button (or the Auto card payment action in Touchscreen Ticket Entry), you will only be able to process card payments (i.e., credit, debit, or SVC).
If the customer wants to tender multiple forms of payment (e.g., cash and a credit card), you must use a standard pay code button to process each non-card payment. If you use the Complete button (or the Auto card payment action in Touchscreen Ticket Entry), you will only be able to process card payments (i.e., credit, debit, or SVC).
-
When Counterpoint displays the Processing dialog and the Insert, Swipe, or Tap Card prompt appears on the iSC250 screen, have the customer insert his or her EMV card into the iSC250 slot.
![]() The
customer cannot insert or swipe a card while you are adding items
to the ticket or at any other time before you specify the amount for
the payment and proceed to the Processing
dialog.
The
customer cannot insert or swipe a card while you are adding items
to the ticket or at any other time before you specify the amount for
the payment and proceed to the Processing
dialog.
![]() The first time you process a card transaction, your iSC250 will display the Loading
message, and then restart, before displaying the Insert,
Swipe, or Tap Card prompt.
The first time you process a card transaction, your iSC250 will display the Loading
message, and then restart, before displaying the Insert,
Swipe, or Tap Card prompt.
The Please wait... Do not remove card message appears on the iSC250 while the payment terminal is reading the chip on the card. If the card is accepted, the customer is prompted to confirm the purchase amount by touching the Yes button on the iSC250 screen.
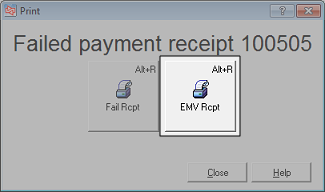
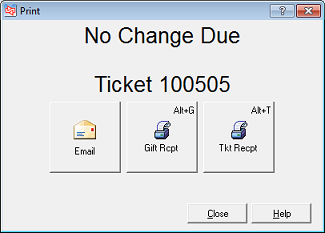
![]() If
the customer touches No or
Cancel, the transaction is
cancelled, prompting the customer to remove his or her card from the
iSC250. You must print a failed payment receipt for each cancelled
transaction by clicking the
If
the customer touches No or
Cancel, the transaction is
cancelled, prompting the customer to remove his or her card from the
iSC250. You must print a failed payment receipt for each cancelled
transaction by clicking the ![]() EMV Rcpt button
on the Print dialog.
EMV Rcpt button
on the Print dialog.
![]() You cannot retry or force the
authorization of failed, cancelled, or declined card transactions.
You cannot retry or force the
authorization of failed, cancelled, or declined card transactions.
When an authorization is obtained for the payment, the customer is prompted to remove his or her card from the iSC250. Depending on the Card Verification Method (CVM) assigned to the card, the customer may be prompted to sign the iSC250 or enter a PIN when the card is removed.
![]() If
no CVM is assigned to the card, the customer will not be prompted
to enter a PIN or provide a signature for the transaction.
If
no CVM is assigned to the card, the customer will not be prompted
to enter a PIN or provide a signature for the transaction.
-
When the transaction is complete, if the ticket is fully paid, the
Print
dialog appears, allowing you to print the necessary receipts for
the transaction or send them to the customer via e-mail.
Counterpoint automatically prints a sales
draft with a signature line for each EMV transaction, followed by
the customer's ![]() receipt, which includes the necessary
EMV information.
receipt, which includes the necessary
EMV information.
Manual
EMV Card Entry
When you are processing a ticket in Ticket Entry or Touchscreen Ticket Entry, if a customer’s card is unreadable, the customer can use the iSC250 to manually enter the necessary card data, which will be encrypted and tokenized by NCR Secure Pay.
Follow these steps if a customer’s card is unreadable at the point of sale:
-
If you are using Ticket Entry, click the custom Manual Entry button you added to the toolbar on the Payment Entry window, and then enter the Amount for the payment and click OK (or click the Pay ticket balance button).
If you are using Touchscreen Ticket Entry, touch the button in your touchscreen layout to which you assigned the Auto card payment by manual entry action, and then enter the Amount for the payment and touch OK (or touch the Pay ticket balance button).
-
Instruct the customer to enter his or her card number using the iSC250 keypad, and then press the Enter key.
-
Instruct the customer to enter the expiration date for the card—in MMYY format—using the iSC250 keypad, and then press the Enter key.
-
Instruct the customer to enter the Card Verification Value/Card Identification (CVV/CID) number for the card using the iSC250 keypad, and then press Enter.
![]() The
customer is prompted for the CVV/CID number only if the CVV Required
for Manual Entry on Device check box is selected for the iSC250
in Device Management.
The
customer is prompted for the CVV/CID number only if the CVV Required
for Manual Entry on Device check box is selected for the iSC250
in Device Management.
-
Instruct the customer to enter the ZIP Code associated with the card using the iSC250 keypad, and then press Enter.
![]() The
customer is prompted to enter a ZIP Code only if the AVS
Required for Manual Entry on Device (EMV only) check box is
selected for the iSC250 in Device
Management.
The
customer is prompted to enter a ZIP Code only if the AVS
Required for Manual Entry on Device (EMV only) check box is
selected for the iSC250 in Device
Management.
-
Complete the ticket normally.
You can also use an iSC250 to manually enter a "card on file" for a customer, which will be encrypted by NCR Secure Pay. The card on file can then be used for future transactions, without requiring the customer to provide the card number again.
Follow these steps to manually enter a card on file for a customer:
-
From the NCR Counterpoint main menu, select Customers > Customers to display the Customers window.
-
Enter or look up the customer for whom you want to enter a card on file.
-
Select the Payment tab and click the Enter Card button in the
Credit
Cards area.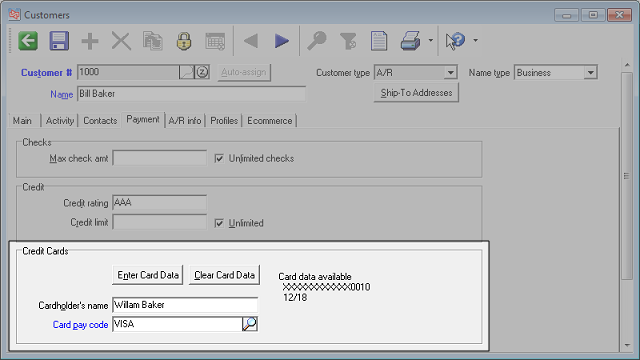
-
Enter the customer’s card number using the iSC250 keypad, and then press the Enter key.
-
Enter the expiration date for the card—in MMYY format—using the iSC250 keypad, and then press the Enter key.
- In the Credit Cards section of the Payment tab, enter the Cardholder's name as it appears on the card.
- Enter or look up the appropriate Card pay code for the card.
- Save your changes and close the Customers window.
Processing
Stored Value Cards
To process stored value cards (SVCs) with an iSC250 that is configured for use with EMV, a Stored value card pay code named SVC or SVCGIFT must be defined on the Pay Codes window (Setup > System > Pay Codes) and assigned to your store on the Stores window (Setup > Point of Sale > Stores).
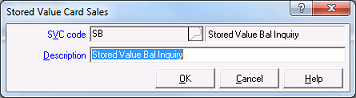
Further, when you activate or recharge an SVC, or request a balance
inquiry for an existing SVC, you cannot enter an SVC
card number manually. Instead, when you activate or recharge
an SVC, you will be prompted to swipe the card through the iSC250's
MSR after you specify the payment type for the transaction. For a
balance inquiry, you will be prompted to swipe the SVC when you click
OK on the ![]() Stored
Value Card Sales dialog.
Stored
Value Card Sales dialog.