Radiant receipts: Receipt Editor
Designer tab
The main area of the Receipt Editor window is the ![]() Designer tab, which displays the fields and other controls on the receipt or Point of Sale form you are working with.
Designer tab, which displays the fields and other controls on the receipt or Point of Sale form you are working with.
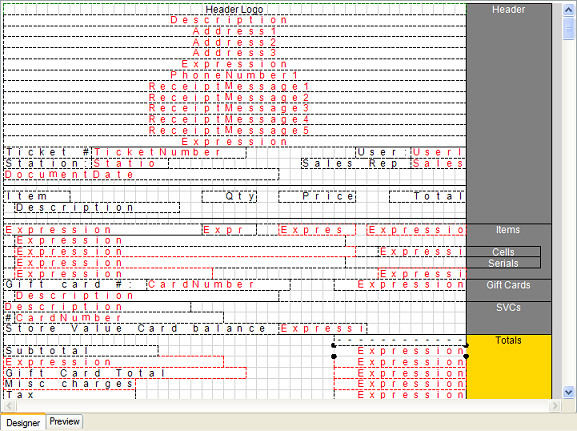
Each section of the form is indicated on the right-hand side of the Designer tab. When you select a control, the section that includes the control is ![]() highlighted in orange. To remove a section from a Point of Sale form, clear the corresponding check box in the Sections list.
highlighted in orange. To remove a section from a Point of Sale form, clear the corresponding check box in the Sections list.

Controls appear on the Designer tab as follows:
-
Text Box controls that display literal strings (i.e., field labels or other specific text values) appear in black text.
-
Data fields and Text Box controls that display expressions (i.e., formulas or functions that are bound to data) appear in red text. Data fields display the corresponding database field name (e.g., TicketNumber or DocumentDate), while the word Expression appears in all Text Box controls that display an expression.
-
A control with a black outline will always print on the form.
-
A control with a red outline is conditional. Conditional controls may or may not print on the form, depending on the result of the corresponding Visibility expression, which is evaluated when the form is printed. For example, the
 Gift Card Total field will only print on a receipt if one or more gift cards are sold on a ticket.
You can modify the layout of a receipt or other Point of Sale form by resizing, repositioning, or removing existing controls, or by adding new controls to the Designer tab.
To resize a control, select the control and drag its sizing handles.
To move a control, simply drag the control to a different position.
![]() You can also modify the Layout settings in the Control properties area to resize or reposition a control.
You can also modify the Layout settings in the Control properties area to resize or reposition a control.
To add a data field or other control to a form, drag the field from the Data tree or the Controls list to an empty square (i.e., the intersection of a column and a row) in the appropriate section on the Designer tab.