Device Management:
Configuring Point of Sale devices
Once you have configured your store settings and registered your workstations, you can use the Device Management (Setup > Point of Sale > Devices) window to configure Point of Sale devices for your workstations.
The Stores and Workstations tree includes all of the workstations that are registered to each of your stores, allowing you to configure devices for any of your workstations, regardless of your current location.
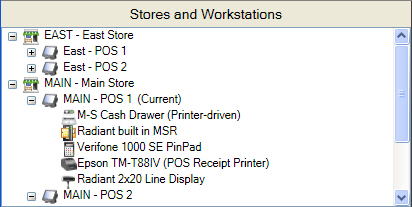
You can add devices to any of your workstations, copy devices from one workstation to another, or delete devices that you are no longer using.
 Adding devices to a workstation
Follow these steps to add a Point of Sale device to a workstation:
-
Select Setup > Point of Sale > Devices to display the Device Management window.
-
In the Stores and Workstations tree, click the
 icon next to a store to display all of the workstations that are assigned to workgroups associated with that store.
![]() The workstation you are using is labeled (Current). However, you can configure devices for other workstations.
The workstation you are using is labeled (Current). However, you can configure devices for other workstations.
-
Click the workstation you want to configure and click the Add a Device button.
- or -
Right-click the workstation you want to configure and select Add a Device.
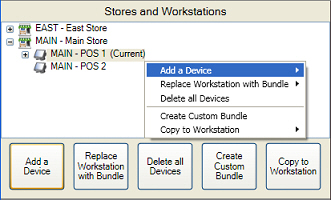
-
From the Add a Device menu, select the type of device you want to configure (e.g., Receipt printer), and then select the specific, certified device (e.g., Epson TM-T88IV) you are configuring.

If you are configuring a non-certified device, select the Other OPOS entry for the type of device you are setting up.
![]() Radiant Systems does not provide support for non-certified devices.
Radiant Systems does not provide support for non-certified devices.
-
Select the device from the Stores and Workstations tree and configure the necessary settings in the
Workstation Device area, as follows: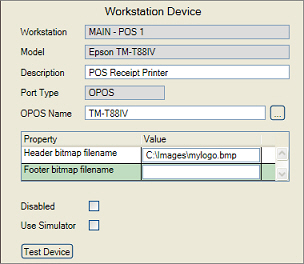
-
Enter a Description for the device.
-
For certified devices, the OPOS Name field automatically displays the device name assigned to the corresponding OPOS driver.
If you are configuring a non-certified device or you need to use a different driver for a certified device, click the ![]() button and select the appropriate OPOS Name option for the device.
button and select the appropriate OPOS Name option for the device.
-
If you are configuring a receipt printer, you can specify an image (e.g., a logo) to include in the header and/or the footer of your receipts.
Enter the path to the .bmp file you want to include in the header (e.g., C:\Images\mylogo.bmp) in the Header bitmap filename field.
If you want to include an image at the bottom of your receipts, enter the path to the corresponding .bmp file in the Footer bitmap filename field.
-
If you are configuring a
line display, select the Message Set that includes the messages you want to appear on the line display.
Next, click the ![]() button next to the Subscribed Events field and select the check box for each event (e.g., READY, OFFLINE, LINE, TOTAL, and so forth) for which you want the device to display the corresponding message.
button next to the Subscribed Events field and select the check box for each event (e.g., READY, OFFLINE, LINE, TOTAL, and so forth) for which you want the device to display the corresponding message.
![]() Counterpoint includes a pre-defined message set for each certified line display, PIN pad, and payment terminal. These message sets include appropriate messages for the events that are typically displayed on each device. Refer to the Device Management: Defining line display messages topic for more information about creating messages sets.
Counterpoint includes a pre-defined message set for each certified line display, PIN pad, and payment terminal. These message sets include appropriate messages for the events that are typically displayed on each device. Refer to the Device Management: Defining line display messages topic for more information about creating messages sets.
-
If you need to disable a Point of Sale device for any reason, select the Disabled check box.
-
If you do not have the device connected, but you would like to simulate the presence of the device for testing purposes, select the Use Simulator check box.
![]() Do not use the device simulator for live Point of Sale operations.
Do not use the device simulator for live Point of Sale operations.
-
Click the Test Device button to display the Tester dialog for the type of device you are configuring, which allows you to Enable the device and perform a basic test of its functionality (e.g., displaying text, requesting a PIN, swiping a card, and so forth).
If the test is unsuccessful, double-check the connection between the device and your workstation, verify the device settings, and test the device again.
If the test is successful, close the Tester dialog to return to the Device Management window.
-
Click the Save button to save your device settings.
![]() Repeat steps 3 through 7 for each device you need to configure for the workstation. You can configure multiple MSR and line display devices, if necessary. For example, you may wish to configure a separate line display for your PIN pad to display payment-related prompts and messages.
Repeat steps 3 through 7 for each device you need to configure for the workstation. You can configure multiple MSR and line display devices, if necessary. For example, you may wish to configure a separate line display for your PIN pad to display payment-related prompts and messages.
Copying devices from a workstation
Once you have configured one or more devices for a workstation, you can copy those devices— including all of their settings— to another workstation at the same store or at a different store. Copying devices simplifies the process of configuring workstations that are similarly equipped.
Copying a single device
Follow these steps to copy a single device from one workstation to another:
-
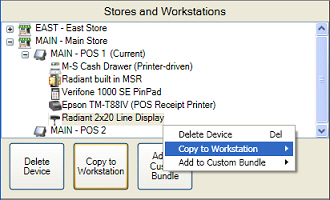
Select the device from the Stores and Workstations tree and click the Copy to Workstation button.
- or -
Right-click the device and select Copy to Workstation.
-
From the Copy to Workstation menu, select the appropriate store, and then select the workstation to which you want to copy the selected device.
-
Click Yes from the
confirmation message to copy the device to the specified workstation.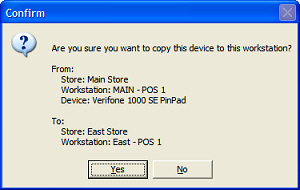
Copying multiple devices
Follow these steps to copy all device from one workstation to another:
-
Select the workstation whose devices you want to copy to another workstation from the Stores and Workstations tree and click the Copy to Workstation button.
- or -
Right-click the workstation and select Copy to Workstation.
-
From the Copy to Workstation menu, select the appropriate store, and then select the workstation to which you want to copy the selected workstation's devices.
-
Click Yes from the
confirmation message to copy all devices to the specified workstation, replacing any devices that may already be configured for that workstation.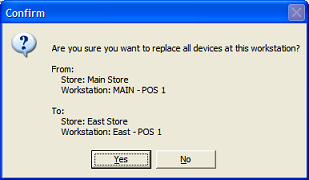
Deleting devices
To delete a device from a workstation, select the device from the Stores and Workstations tree and click the Delete Device button, or right-click the device and select Delete Device (or press DELETE), and then click Yes from the confirmation message.
To delete all devices from a workstation, select the workstation and click the Delete all Devices button, or right-click the workstation and select Delete all Devices, and then click Yes from the confirmation message.