Displaying Ads on an Ingenico iSC250 Payment Terminal
In previous versions of NCR Counterpoint, you could configure an Ingenico iSC250 payment terminal to display a single advertisement or other image when it was idle.
In this version, you can still display a single image on an iSC250 payment terminal, but the new UniTerm payment controller (part of local device services) also allows you to configure your iSC250 EMV payment terminal(s) to display a sequence of "rotating" images. You can choose the images to display, the order in which they appear, and the amount of time each image remains on the iSC250's screen before the next one is displayed. This feature allows you to present multiple advertisements or announcements to your customers at the point of sale.
 The "scrolling receipt" that appeared as items were added to (or removed from) a ticket in previous versions of Counterpoint is no longer supported on iSC250 EMV payment terminals. The "scrolling receipt" still appears on iSC250 devices that are configured as non-EMV payment terminals.
Follow these steps to create an upload file that includes a series of images and upload the images to your iSC250 EMV payment terminal(s):
- Create a series of 480x272 pixel, color images you want to display in sequence while your iSC250 EMV payment terminal(s) are idle.
- On your Counterpoint server, browse to the \Bin directory of your Counterpoint installation directory (e.g., C:\Program Files (x86)\Radiant Systems\Counterpoint\CPSQL.1\Bin).
- Double-click the IngenicoAdsEditor.exe file to start the Ingenico Ads Editor utility.
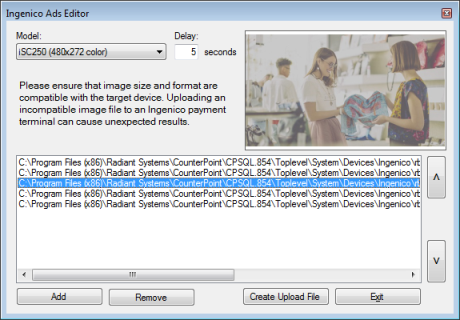
- Make sure the iSC250 (480x272 color) option is selected from the Model list box.
The Model list box includes additional Ingenico payment terminal models that are not yet certified for use with NCR Counterpoint.
- In the Delay field, enter the number of seconds you want each image to appear before the next image in the sequence is displayed.
- Click the Add button, browse to the image files you created, select an image, and click Open to add the image to the sequence. A preview of the image appears in the upper, right-hand corner of the Ingenico Ads Editor window and the path and file name for the image appear in the list below it.
Repeat this step for each image you want to add to the sequence.
You can include up to ten images in the sequence.
You can rearrange the files in the list to change the order in which they will appear on your payment terminal(s). To do so, select an image from the list, and then click the  button to move the image up (i.e., earlier in the sequence) or the
  button to move it down (i.e., later in the sequence).
If you want to remove an image from the sequence, select the image in the list and click the Remove button.
- When you have added the images you want to the sequence, click the Create Upload File button and save the iSC250_ADS.TGZ upload file.
- To make the upload file available to iSC250 EMV payment terminals connected to workstations in a LAN environment, copy the file to the \Configuration\PSForms subdirectory of your company directory (e.g., C:\Program Files (x86)\Radiant Systems\CounterPoint\CPSQL.1\Toplevel\MyCompany\Configuration\PSForms).
To make the upload file available to iSC250 EMV payment terminals connected to WAN workstations, copy the file to the C:\Program Files (x86)\NCR\Device Services API\DevicesUploadFolder on each WAN workstation.
- On each workstation to which an iSC250 EMV payment terminal is connected, start Counterpoint, log in to Ticket Entry or Touchscreen Ticket Entry, or select Setup
> Point of Sale > Devices.
- Select Device Information Test, then select Save & Close to save the device settings. This process reloads the devices, including your custom logo and rotating ads.
The iSC250 will restart during the upload process.
To configure an iSC250 EMV payment terminal to display a single advertisement or other image when the payment display is idle, follow these steps:
- Create a 480x272 pixel, color image you want to display on the iSC250 when the payment display
is waiting or idle and save it as iSC250_AD1.jpg or iSC250_AD1.png.
- To make the image available to iSC250 EMV payment terminals connected to workstations in a LAN environment, copy the file to the \Configuration\PSForms subdirectory of your company directory (e.g., C:\Program Files (x86)\Radiant Systems\CounterPoint\CPSQL.1\Toplevel\MyCompany\Configuration\PSForms).
To make the image available to iSC250 EMV payment terminals connected to WAN workstations, copy the file to the C:\Program Files (x86)\NCR\Device Services API\DevicesUploadFolder on each WAN workstation.
- On each workstation to which an iSC250 EMV payment terminal is connected, start Counterpoint, log in to Ticket Entry or Touchscreen Ticket Entry, or select Setup
> Point of Sale > Devices.
- Select Device Information Test, then select Save & Close to save the device settings. This process reloads the devices, including your custom logo and rotating ads.
A multiple-image upload file (iSC250_AD1.TGZ) supersedes a single image file (e.g., iSC250_AD1.jpg). If both files are uploaded, the sequence of rotating images will appear on your payment terminal(s), not the single image.
To configure an iSC250 non-EMV payment terminal to display a single advertisement or other image when the payment display is idle, instead of a sequence of images, follow these steps:
- Create a 480x272 pixel, color image you want to display on the iSC250 when the payment display
is waiting or idle and save it as cu1.jpg.
- To make the image available to iSC250 non-EMV payment terminals connected to workstations in a LAN environment, copy the file to the \Configuration\PSForms\Ingenico\iSC250 subdirectory of your company directory (e.g., C:\Program Files(x86)\Radiant Systems\Counterpoint\CPSQL.1\TopLevel\DemoGolf\Configuration\PSForms\Ingenico\iSC250).
- Reboot the iSC250 payment terminal.
- On each workstation to which an iSC250 EMV payment terminal is connected, start Counterpoint, log in to Ticket Entry or Touchscreen Ticket Entry, or select Setup
> Point of Sale > Devices.
- Select Device Information Test, then select Save & Close to save the device settings. This process reloads the devices, imcluding your custom logo and rotating ads.
Displaying multiple images is currently not supported for iSC250 non-EMV payment terminals.