Filters
Another useful Counterpoint feature is the ability to limit, or filter, the records you working with in a particular window to those that meet specific criteria. For example, if you want to view only items that you normally purchase from a certain vendor, you can define a filter that displays only the item records with the Primary vendor value you're interested in.
You can define filters to limit the records you can view and edit from most windows in Counterpoint.
You can define filters to limit the records you can view and edit from most windows in Counterpoint. Click the ![]() toolbar button (or press CTRL+T) to display the appropriate Filter window, and then define the criteria you want to use. When you apply your filter, you will only be able to view and edit records that match the criteria you specified.
toolbar button (or press CTRL+T) to display the appropriate Filter window, and then define the criteria you want to use. When you apply your filter, you will only be able to view and edit records that match the criteria you specified.
You can also apply filters to lookups. From any LookUp window, click the Options button, and then select Filter to display the corresponding Filter window. When you apply a filter to a lookup, the LookUp window will display only those records that match your criteria.
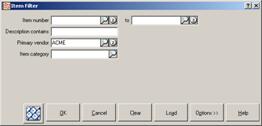
The criteria that are available from each Filter window depend on the type of record you are working with. For example, the ![]() Item Filter window allows you to filter items by a range of Item number values, as well as by specific Description, Primary vendor, and Item category values.
Item Filter window allows you to filter items by a range of Item number values, as well as by specific Description, Primary vendor, and Item category values.
To define a filter that displays only items you purchase from a particular vendor, select that vendor from the Primary vendor field.
You can specify a single condition for your filter, or you can combine multiple criteria to define a filter with more complex requirements. For example, you could define an item filter that displays only items from a particular vendor that are also in a particular category.
When you have chosen the criteria you want to use, click OK to apply your filter and limit the corresponding records to those that match all of the conditions you have defined.
In addition to the criteria fields that are available, each Filter window includes the following buttons:
OK
Click this button to apply the filter you have defined.
When you apply a filter to a window with a toolbar, the Set Filter button displays the ![]() icon to indicate that a filter is in effect.
icon to indicate that a filter is in effect.
When you apply a filter to a LookUp window, the word Filtered appears next to the  icon to indicate that a filter is in effect.
Cancel
Click this button (or press ESC) to cancel your changes and close the Filter window.
Clear
Click this button to clear the filter criteria.
If a filter is in effect for a particular window, clear the filter and click OK to remove the filter and display all available records in the window.
Load
Click this button to load a saved filter from your database.
Options
Click this button to display a menu of additional filter-related options.
These options allow you to save a filter for future use, load a saved filter, delete a saved filter, preview the results of the current filter, or customize the available criteria fields.
Help
Click this button to display the NCR Counterpoint online help.